Flow editor

Flow Editor is the heart of Maxbot. Designing a solid main flow is the foremost important task when creating a bot before even thinking about how to make it smart.

Within the Flow Editor, you can set up conversation blocks, connect them together, provide instruction on navigation. You can even load data dynamically into the flow, run it fast and easily.
Topic Lists

The process starts when you create a topic, to do this you need to click on add new button, a small form will appear to ask you for topic’s name and some description, once created it will appear on the list of the available topics, on each topic you can edit, delete, test, and go to the flow editor.

Overview of flow editor block cases

Once a topic is created, on flow editor you start with one case block, each block represents a set of options bellow is a simple breakdown of the interface of each block :

Functionalities of flow editor block cases

Vertical option panels

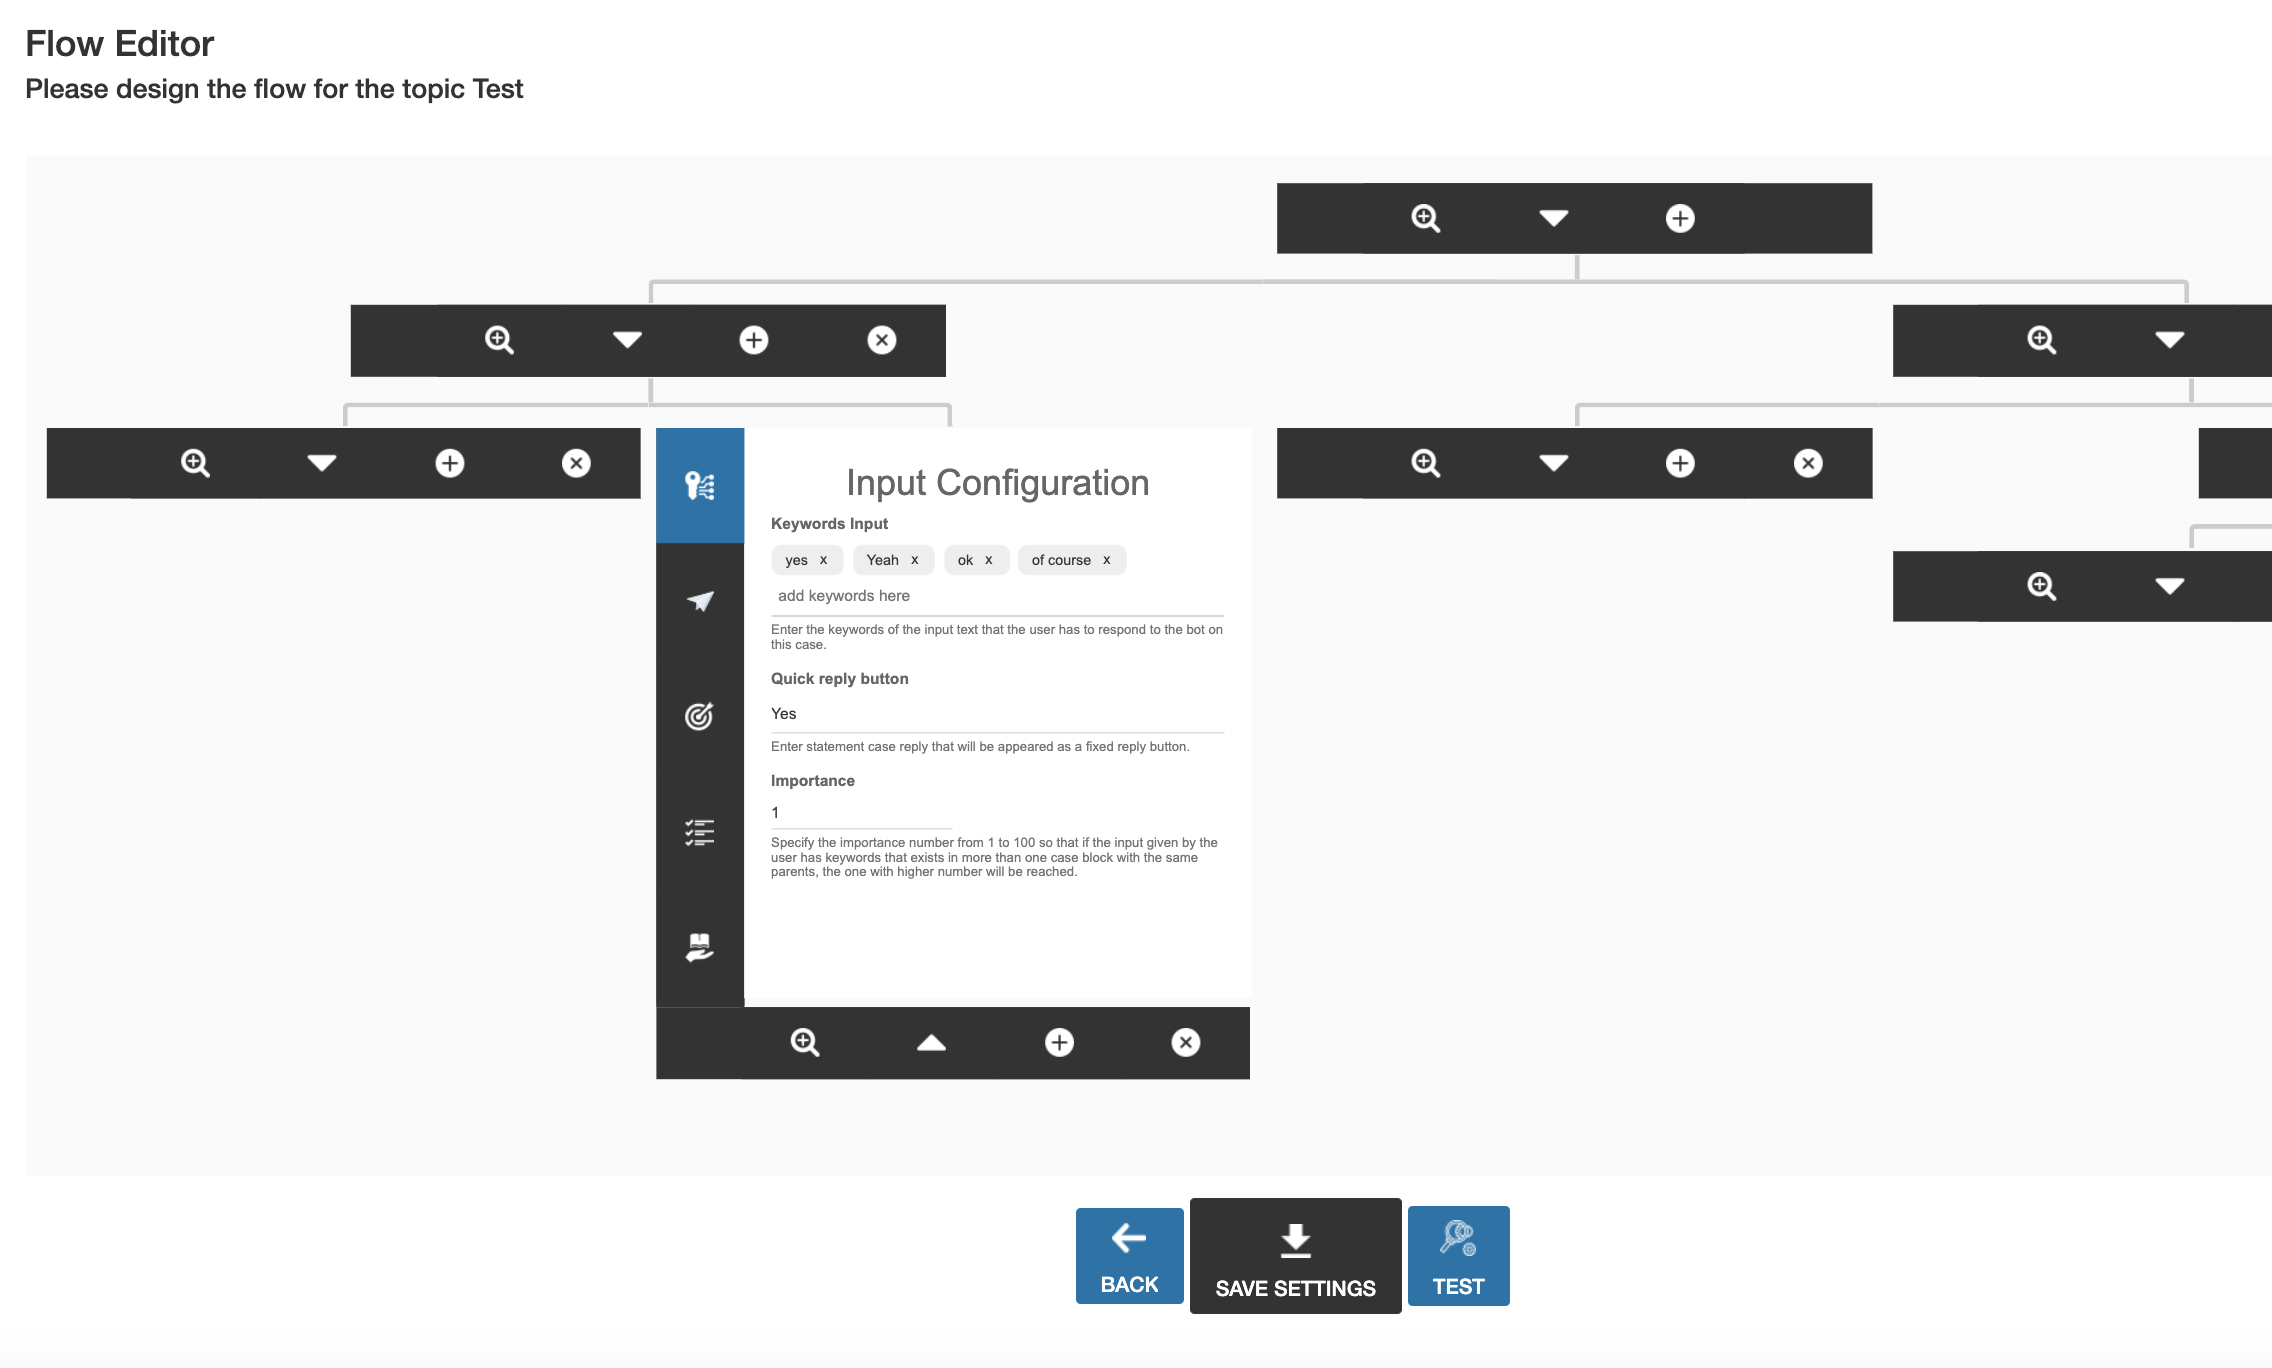
  • Input configuration Panel : This panel contains triggers of what may the user enter on the input chat in order for the bot on to get to the case block.
  • Bot Messages Panel : This panel lets the admin put what the bot will respond if the user has reached that block.
  • Next Block Panel : Shows different option on how you want the bot to handle users responses on the next blocks.
  • Bot Tasks Panel : Shows the different tasks that bot may do while chatting with user.
  • Unsettled users answers Panel : Is made to train your bot to have better experience with clients, it contains all the users responses that hasn’t match any of the available blocks, so that the admin may add other block cases accordingly.

Horizontal option buttons

  • Zoom button : This will zoom in and zoom out the selected block.
  • Reduce/Expend button : This will reduce or expend the selected block.
  • Add a child block button : This will add a child block from the selected parent block.
  • Remove block button : This will remove the selected block along with its children and grand children.

Input Configuration Panel

This panel is the first tab in the left of the Flow Editor case blocks. It certainly depends on how the parent block is handled in order for this panel to appear one of these options on the next block panel is checked :

  • Use keywords to target the next block for the conversation to flow.
  • Force the user to choose from the available fixed quick replies options.

If Use keywords to target the next block for the conversation to flow is checked

Keywords is the feature that increases bot's ability to understand user’s inputs even with different types of wording.The more set and phrases you add to your bot, the more it becomes smarter and Keyword will allow you to create a reply base on users' message thus it can trigger a block no matter where you are in the flow.

Basically, if in the parent block we want to use keywords to target the next block for the conversation to flow this panel will have an option which asks the admin to set the anticipated keywords that the user may enter, if any of these keywords match what the user has entered, the bot will get to this case block.

When you don't want the conversation between users and bot to stop with no response because users type some questions or sentences which disrupt your flow, meaning none of the keywords you set on the children blocks have matched what the user said. At that time, we will use the default message feature to prevent that situation to happen, this message is used to entice users to write text having keywords from the already available children blocks that you have designed.

Here's an example of what were talking about earlier in the admin and users area:


Another option that admin will have to set is the quick reply button, the bot may use the quick reply buttons in case none of the keywords on the children block has matched what the user said and after a parameter attempts to get the users to write about the flow, eventually these quick reply buttons will appear and force the user to choose from them so it can go on with the conversation.

The message of the user that couldn’t be solved with the already made flow will be automatically be registered on the unsettled users answers panel in order for the admin to re-examine the the chat flow.

The third option that you need to configure is the importance there will be times when you would prefer that some case blocks would be chosen more frequently than others. The importance value controls the probability of how the case block is chosen if the input given by the user has keywords that exists in more than one case block with the same parent, the one with higher number will be reached.

Here's an example of what were talking about earlier in the admin and users area:


If Force the user to choose from the available fixed quick replies options is checked

In this case only one option is given to the admin which is to set the quick reply button for this case block, in this case the user will not have the option to write an answer but only to click on the button options so that it goes to the suitable block.

Next Block Panel

This panel is very important as it control the flow of the conversation and how you want to handle user’s responses, there are four options that you can choose from for this purpose:


  • Use keywords to target the next block for the conversation to flow.
  • Restore the user input of this block into one of the available data column.
  • Force the user to choose from the available fixed quick replies options.
  • Close conversation or join this block to the other block cases for the conversation to flow.

If Use keywords to target the next block for the conversation to flow is checked

This means that you want to answer users queries using keywords, as discussed before you need to set the default message that entice users to write text having keywords from the available children blocks, another option will be given is the repeat tolerance which is how many times you want your bot to repeat the default message until it resorts to the fixed quick reply buttons.
Finally, an option will ask you if you want to store the user reply of this block to the database, if it’s checked then you need to set a variable so hat you want the reply to be stored as.

If Force the user to choose from the available fixed quick replies options is checked

In Maxbot we have several different ways to receive input from users. These range from standard text input in chat to pre-fixed quick reply buttons. So in this option users will not have the possibility to write text but to choose from the quick reply buttons that will appear on the bottom of the chat widget. Also in this case you can capture the chosen response by checking the option of storing the user choice of this block to the database this lets you put the variable that you want the choice to be stored as.

If Restore the user input of this block into one of the available data column is checked

Before diving into this option let’s talk about the Data Columns page options, in order for you to use this option you need to set some data columns where you can store user’s personal data such as name, email address, phone number, home address etc.

So to do that first go to the page option data columns and click on the button add new, a small form will appear to ask you for the name of the data column name and a variable name, this variable name can be used on message bubbles, @<your-variable≷ can identify the user’s entries. You also need to set column validation choose how you want to validate user’s entries, there are 5 options you can select from, if one of them is selected then you need to enter a validation message, this message will appear on the user end so that it lets him know that the data he entered was not valid, the bot will ask him to write a valid one.

For example here, if we want to register the user's phone we must choose this option and then we must choose the phone column previously set in the Data Columns option page, as follows:

The following conversation will show the functionality of this option, the bot asked the user to give his phone, that one entered a wrong data, the bot asked him to write his phone correctly, the bot was able to retrench the user entered data using the mention feature, using @tel which is the variable sets before in the Data column option page, the bot displayed the data in the chat conversation, you can do this in the same way with the other columns of data namely the name, the e-mail address, etc.

Let’s go back to our option:
When choosing this option, the bot will store what the user enters from the chat into one of the available columns that’s been already set in the previous options,when you choose one of the columns from the available ones, the response of users to that block will be stored in that column. It means that block will stop and wait to get the response from the user, then save it under the column name.
Each column name has a variable name, these are variables that are defined by you, that captures the information during the conversation between bot and users. These variables are for storing the content that is temporary and is used only in the conversation between bot and users. these values will be reset when the user starts a new conversation. Thus, you can use the chosen @variable-name on the next message bubbles.
You can see all the data that’s been given by users in the users data page option that we will walk through it on the next section.

You can see all the data provided by the users in the Users Data option page, below:

You will find all the user data saved by the bot, this table has data for Date columns, and the columns created by the administrator in the Data Columns option page, and finally the answers / choices of users when the option that asked you to define a variable so that the answer is stored is checked, in this column will be stored answers or user's choice like this:

<Storage-Variable-Name>: choice or answer of the user

You can subsequently delete or modify any entry, by clicking Edit or Trash like this:

User data is very important if we want to follow the development of a company, that's why we introduced the functionality to download the Excel version of these entries to view and analyze the content, by clicking on the button. below the Export as Excel Stylesheet option page.

On the next page you find is an example of an Excel sheet exported from this list of user data:

Maxbot
Chatbot Builder

Maxbot

Chatbot Builder

My name is Maxbot. I'm a wordpress plugin for designing, developing and training chatbots.